

Salt-Dough Ornaments
A fun project to do with your kids for the festive season, salt dough ornaments are very simple to make; calling this a recipe is making it sound more complicated that it really is! With a few ingredients that are sure to be in your pantry, you can make these precious mementos that last for years and make great gifts for your extended family. Which grandparent would be able to resist a hand-painted tree ornament made by their grandchild?
My then-three-year-old and I enjoyed making these ornaments last year to ring in the festive season. My son painted over the finished ornaments with non-toxic acrylic paint, and I followed up with a second coat of paint. If you’re feeling particularly festive, throw on some glitter to add extra personality to your one-of-a kind tree ornaments.
You will need:
- 2 c. all-purpose flour
- 1 c. salt (regular table salt)
- 1 c. lukewarm water
- 1 straw
- Assorted cookie cutters (we used Christmas trees and stars)
- Non-toxic acrylic paints
- Parchment/baking paper
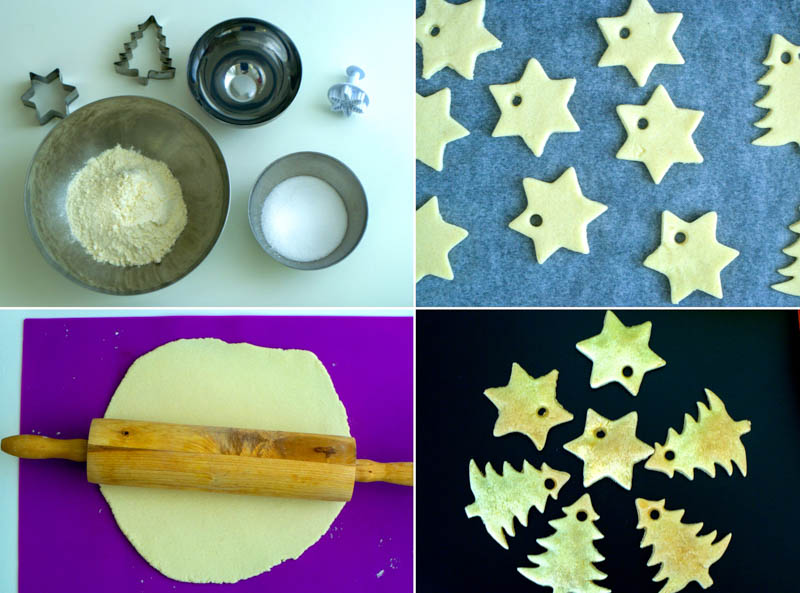
Instructions:
- Line a baking sheet with parchment.
- Mix together the flour and salt in a large mixing bowl.
- Add the water very slowly, a little at a time, mixing it with the dry ingredients until it is well incorporated.
- Bring the dough together and knead it (just for a couple of minutes) until the dough is smooth.
- Dust a little flour on a work surface, and use a rolling pin to roll out the dough until it is around a quarter-inch thick.
- Cut out shapes using cookie cutters and transfer them to the baking sheet.
- Using a straw, make little holes in the shapes close to the top of each ornament.
- Transfer the baking sheet to an oven preheated to 150°C*. Bake for about 2 hours, turning over midway through the baking time.
- After 2 hours, check to see if the ornaments are completely dried out; if not, bake for an additional 5 minutes.
- Take out the ornaments and let them cool down.
- Paint with non-toxic acrylic paint, and add embellishments such as glitter if you’d like.
- Once dry, knot a string through the hole in the ornament and your ornament is ready to go up on your tree!
*I baked my ornaments at 180°C for 30 minutes, which led to the ornaments puffing up slightly. I recommend that you bake them at 150°C for around 2 hours, if you want them to stay flat.
Ideas on customising your handmade tree ornaments:
- You could try making scented play dough by adding essential oils while preparing the dough. Holiday scents such as peppermint, orange or cinnamon will make your house smell like Christmas!
- Kids can personalize their salt-dough ornaments by adding their handprints or thumbprints to the ornament and then painting the handprint a different colour or adding glitter to make it stand out.
- Get creative with the leftover dough bits. We used these to make salt-dough alphabets, using letter-shaped cookie cutters.

Text and photos by Shinta Simon
Shinta is a blogger, part-time baker, and mom to a three-year-old. She lives in Baden, Switzerland and in her “previous life” as a marketing professional was based in Bangalore, India. She shares her passion for food on her blog, Caramel Tinted Life and is also part of the team behind Namaste Switzerland.