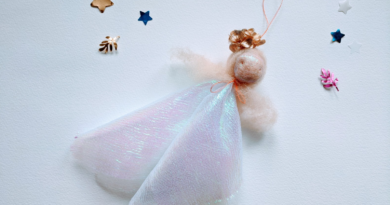

Pine Cone Fairies

I just love crafts which are inspired by nature, and these pine cone fairies have to be one of my all-time favourites. In my children’s classes we have enjoyed making so many different types of pine cone fairies, and I have also done this as a crafting evening with adults, so it’s really one of those nice activities where everyone can have a go. A couple of years ago, I even enjoyed making these as Christmas presents for my own family and friends. If you’re not so keen on fairies, this craft can easily be adapted into pine cone gnomes, princesses, wizards or even a Christmas monster!
In my classes we always like to have a story to go with our craft project, so if you’re making these decorations with your children, you might like to add to the occasion by reading a story together first. “The Christmas Fairy” by Anne Booth is a cute story for young children, or for older children and adults the classic “The Nutcracker” is a lovely story to read together at Christmas. My favourite version is by Rachel Elliot.
To make a Pine Cone Fairy you will need:

- A pine cone
- A 2-cm natural bead
- Two 1-cm natural beads
- Two skeleton leaves
- A piece of twine
- Fluff (Filzwolle) in 2 or 3 different colours
- Black and red coloured pencils
- A pipe cleaner
- White PVA glue
- Scissors
Optional
- A few sequins or gems for decoration
- Hat, e.g., acorn top, button, half a walnut shell
- Glue gun (optional but makes the project easier!)
Alternatives:
All of the above are available in hobby stores like Coop Bau + Hobby, but you could also experiment with the following alternative ideas:
- Use painted polystyrene balls for the head and arms, or even make balls from pink playdough. Press or dry 2 normal leaves for your wings, or cut out two pieces of tissue paper or sparkly foam.
- Use wool or fabric for hair.
- Use a piece of ribbon or wire for the hanger, or hot glue the pine cone on a piece of wood or stone to make the fairy stand up instead.
- Experiment with all sorts of different things for hats and decorations, e.g. buttons, nut shells, sea shells, pebbles, sequins, felt etc. Often the natural decorations or potpourri you find around at Christmas can provide some great hats and accessories!
- If you want to add a touch of sparkle, you could cover your pine cone with glitter!
Steps:
- Tie or hot-glue the twine to the top of the pine cone. Where the twine meets the pine cone will be the back of the fairy.
- Glue the larger bead to the top of the pine cone for the head. (You might be able to put it over the top prong if it is thin or cut the prong off to make room.) Make sure that the twine is still in the right position for hanging the pine cone. If you are using white glue rather than hot glue, leave this to dry in place before starting on the next steps.
- Cut the pipe cleaner so it is the right length for your arms; this will depend on the size of your pine cone. Cover the pipe cleaner in white glue. Starting at one end, twist a long strand of the Filzwolle around the pipe cleaner until it is completely covered. It is easiest to use a long, thin strand of Filzwolle. Leave the very ends of the pipe cleaner free of fluff.
- Glue the small beads as hands onto the ends of the pipe cleaner.
- Position the covered pipe cleaner around the back of the pine cone, so they curve round on either side as arms.
- Glue on more thin strands of Filzwolle as hair and as a scarf.
- Turn the pine cone over and glue the skeleton leaves overlapping onto the back of the pine cone. Using a large sequin or button (and/or hot glue) can help to secure the wings at the back. You might need to push the wings up slightly higher than in this photo!
- Glue on your hat and any decorations
- Draw your fairy’s face using the coloured pencils. (You can also use felt tips if you prefer, but test it first, as some pens can bleed into the wood.)
- Leave to dry.
- 11) Hang your finished fairy on your Christmas tree and make a wish!
Text and Photos by Lemady Rochard
Lemady Rochard is an artist and illustrator living near Einsiedeln. She runs the Storycraft Studio near Zürich, where she offers themed art and craft classes and parties for children from 1.5-10 years old. She has two young children and in her spare time enjoys travelling and drinking lots of tea! She can also be found on her website and Facebook page.