Gingerbread House
I always love to see the pictures of gingerbread houses that appear in magazines and blogs around the Christmas period. They look so pretty with their straight walls and immaculate decoration and make me want to shrink down and move right in.
Each year I think about getting one of the kits and making one, then I remember I have two small children who want to help. I’m not sure that my nerves are ready for broken pieces of gingerbread and a two year old who has eaten so much icing that he ends up sick. So this year we have made our own version of a gingerbread house which won’t break (too easily) and can be reused for the next few years until I am ready to tackle the real thing!
Please note – this takes approximately one week to make with all the drying time.
Materials:
- A strong cardboard box (any size you want but the bigger it is the longer it will take!)
- Sticky tape
- Toilet roll (plain white works best)
- PVA glue (universalklebstoff/Colle universelle/Colla universale)
- Scissors
- Brown paint
- Tissue paper (two or three colours)
- Festive stickers, cotton wool, glitter etc. for decoration
Instructions:
1) First cut out any window and door shapes that you want on your gingerbread house. It is far easier to do this before you make the roof.
2) Hold the two long flaps from the top of your box up so they form a roof shape and secure with sticky tape. Now cut the two shorter flaps to make the gable ends and stick with tape.
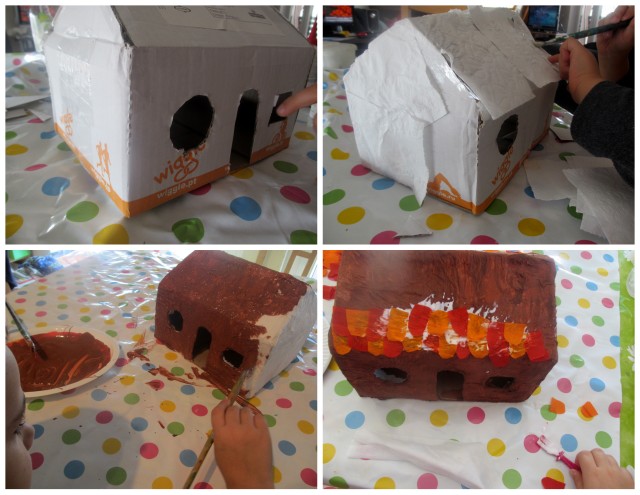
3) Put equal amounts of PVA glue and water in a dish and mix until they are blended together. Separate the pieces of toilet roll into individual sheets and stick them all over the gingerbread house using the PVA/water mix. It is best to use a paint brush to apply the glue mix so you can get right into all the corners.
4) Leave your gingerbread house to dry, this will take about 24 hours. Your gingerbread house should now be quite hard but if it feels like the sides are not strong enough, or if you have missed any areas, apply another layer of toilet roll and leave to dry.
5) Mix the brown paint with an equal amount of PVA glue and paint all over your house. This can be slightly tricky as the toilet roll will absorb a lot of the paint and you need to use a dabbing technique rather than painting with large strokes.
6) Leave to dry overnight and then if necessary apply a second coat of brown paint.
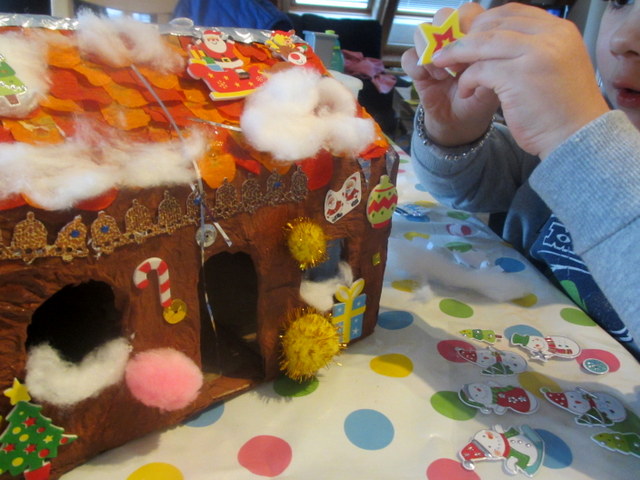
7) The house is now ready for decorating. Cut petal shapes out of tissue paper and glue them on the roof in rows starting with the bottom one. Layer each row on top to achieve the roof tile effect. This is quite time consuming for small children but a great way to practice patterns!
8) Add stickers, glitter, cotton wool snow and any other items you want to decorate your house. You could use real sweets but only if you have children who are old enough to know not to eat them!
9) I put a battery tealight inside as a final touch to give it a warm, welcome glow. Safety note – DO NOT use a real tealight as your gingerbread house may catch fire.
By Karen Clayton
Karen is originally from Scotland and now lives in Zurich with her husband and two sons. She is a qualified primary school teacher and now runs her own tutoring business, Smart Owls, offering English tuition for children and workshops for different age groups. More information can be found at http://smartowls.wordpress.com/